Lesson One.
To get started with helping Pirate Pete, we need to learn how to use and read a compass.
A Compass
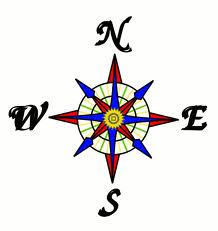
A compass is a very useful and important tool for people reading maps. Since we will be reading maps, we had better learn how to use a compass. A compass tells us which direction to travel in. It shows the direction of North, South, East and West. As you can see on the picture, there is an N, E, S and W. These four points are called the cardinal points of a compass. Almost every map you see will have a compass displayed. Generally North is pointing up on a map however; if you are holding a compass you will have to turn to the correct direction to ensure you find North.
As you may already know, most people say the order of direction is North, South, East and West however; we must remember that East is on the right side of North and South and West is on the left. I have a little phrase to help you remember where on a compass the points are situated. It goes like this... Never Eat Soggy Weetbix. See how each capital letter stands for each direction. This is just a simple compass. There is also and eight (8) point compass.
As you may already know, most people say the order of direction is North, South, East and West however; we must remember that East is on the right side of North and South and West is on the left. I have a little phrase to help you remember where on a compass the points are situated. It goes like this... Never Eat Soggy Weetbix. See how each capital letter stands for each direction. This is just a simple compass. There is also and eight (8) point compass.
8 Point Compass
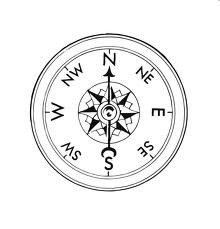
See how there are now eight (8) directions on the compass. Having more points on a compass gives a more accurate reading of where an item is located. Pirate Pete may have these directions on his map so we had better learn them. In between North and East is called North-East. Between South and East is South-East and so on.
Click on the page 'Blank Compass'.NOTE: You will find this page when you hover your mouse over the process button. Click the 'Fill in the Compass' link on this page. Click on the icon of the printer at the top right hand side of the page. Once printed fill in the directions.
There is also a 16 point compass which has another set of points between each of the eight. The other points are called:
* North North-East * East North-East *East South-East *South South-East
* South South-West * West South-West *West North-West *North North-West
You can draw in all extra lines on your own personal compass and label them if you wish.
Activity:
Hover your mouse over the process tab and click on the 'Treasure Map' page. There is a link under the treasure map. Click on the link 'directions sheet' and print of this page of directions. Please date this page and once complete, glue into your SOSE workbook.
Activity: Click on the Direction Activity Page. Once you are on this page read the instructions to click on the link and complete the activity.
Lesson One is complete, now for lesson two.
Lesson Two
The next step we must learn about is the scale.
Lesson Two
The next step we must learn about is the scale.
A Scale
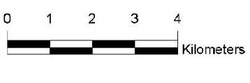
As you know, a map is a much smaller version than in real life. It is made smaller by using a scale. Almost every map contains a scale. The scale tells us how much smaller than real life the map is. For example: in the picture to your left, the scale is 1:10000 this means that for every one (1) centimeter of the map, it is equal to ten thousand centimeters which is equal to one (1) kilometer in real life. The entire map gets scaled using the same scale. This will ensure that all areas on the map are in proportion to the rest of the map. The larger the area is on the map the greater the scale will be. If you were to draw a road map of your city to another city, you would have to use a large scale to be able to fit the entire city on one piece of paper. Your scale would be something like - 1:20000 or 1:50000 these would mean 1cm = 20000cm (2km) or 1cm = 50000cm (5km).
It is very important that we know how to accurately read, use and understand a scale. Quite often the scale is located in the legend box of a map or very close to it. We will be learning about the legend box in our next lesson.
Activity: Please click on the Map of Australia page. This page is found using the same directions with the compass page. On this page you will see firstly a paper ruler print out. Please click on this link and print the ruler. There are 5 rulers on 1 page so please only print 1 sheet and share with 4 other students. After you ruler is printed and cut out, please click on the Activity Sheet - Scale button. This worksheet must be printed out and dated. Complete the worksheet and put into your SOSE folder.
Activity: Please click on the Map of Australia page. This page is found using the same directions with the compass page. On this page you will see firstly a paper ruler print out. Please click on this link and print the ruler. There are 5 rulers on 1 page so please only print 1 sheet and share with 4 other students. After you ruler is printed and cut out, please click on the Activity Sheet - Scale button. This worksheet must be printed out and dated. Complete the worksheet and put into your SOSE folder.
Now that we have successfully learnt about the scale on a map we can now move onto the key or legend.
Lesson Three
Key/Legend
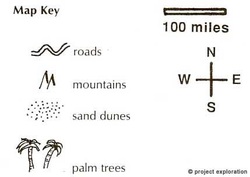
As you now know from learning about Scale maps are shrunk down to a smaller size. Because maps are scaled down to size, symbols are used to represent different objects such as trees and roads. All symbols used in a map must be placed in a Key/Legend box with the name of the object so that readers can clearly identify what and where each object is. Symbols can be both shapes and or colours. Some maps have pictures of the object like the picture to the left and some maps use colour for objects. E.g. A green circle might mean trees and a blue circle might mean water and a red circle might mean a food area.
Activity: Click on the Key/Legend page to complete activity.
Activity: Click on the Key/Legend page to complete activity.
Now that you have learnt about the Key of a map there is only one last thing to learn before helping Pirate Pete! That is co-ordinates.
Lesson Four
Treasure Map with co-ordinates

The picture to the left is a Treasure Map with co-ordinates. The co-ordinates are the numbers on the left of the map and the bottom of the map. These co-ordinates help the reader to locate objects or places on the map. As you can see there is a palm tree at 12,13.
The co-ordinates are placed on lines which are called axis. There is an x axis and a y axis. The x axis goes across the map and the y axis goes up the map. When plotting co-ordinates you must always remember that you put the x before the y.
Just remember that you have to go across the map before you can go up.
Click on the 'Co-ordinate game' link below to play a quick game. This game is a treasure hunt game. It will open in a new window.
Co-ordinate game.
Activity: Click on the link below to complete two co-ordinate activities. You must print the documents, complete them and then place into your SOSE folder for marking.
Co-ordinate Activity 1
Co-ordinate Activity 2
Co-ordinate Activity 1
Co-ordinate Activity 2
WOW! You have now finished learning the basic features of a map. It is now time to help Pirate Pete!
